Being an Effective Spec Reviewer

The first time testers can impact a feature is often during functional and design reviews. This is also when we make our first impression on our co-workers. If you want to make a great initial impact on both your product and peers, you have to be an effective reviewer.

In my seven years in testing, I’ve noticed that many testers don’t take advantage of this opportunity. Most of us fall into one of four categories:

  1. Testers who pay attention during reviews without proving feedback. This used to be me. I learned the feature, which is one of the goals of a review meeting. A more important goal, however, is to give feedback that exposes defects as early as possible.
  2. Testers who push-back (argue) at seemingly every minor point. Their goal is to increase their visibility and prove their worth as much as it is to improve the product. They learn the feature and can give valuable feedback. However, while they think they’re impressing their teammates, they’re actually frustrating them.
  3. Testers who attend reviews with their laptops open, not paying attention. If this is you, please stop; no one’s impressed with how busy you’re pretending to be.
  4. Testers who pay attention and learn the feature, while also providing constructive feedback. Not only do they understand and improve the feature, but they look good doing it. This can be you!

How do you do this, you ask? With this simple recipe that only took me four years to learn, I answer.

1. Read the Spec

Before attending any functional or design review, make sure you read the documentation. This is common sense, but most of us are so busy we don’t have time to read the specs. Instead, we use the review itself to learn the feature.

This was always a problem for me because although I learned the feature during the review, I didn’t have enough time to absorb the details and give valuable feedback during the meeting. It was only afterwards when I understood the changes we needed to make. By then it was too late–decisions had already been made and it was hard to change people’s minds. Or coding had begun, and accepting changes meant wasted development time.

A great idea Bruce Cronquist suggested is to block out the half hour before the review meeting to read the spec. Put this time on your calendar to make sure you don’t get interrupted.

2. Commit to Contributing

Come to every review with the goal of contributing at least one idea. Once I committed to this, I immediately made a bigger impact on both my product and peers. This strategy works for two reasons.

First, it forces you to pay closer attention than you normally might have. If you know you’ll be speaking during the meeting, you will pay closer attention.

Second, it forces you to speak up about ideas you might otherwise have kept to yourself. I used to keep quiet in reviews if I wasn’t 100% sure I was right. Even if I was almost positive, I would still investigate further after the meeting. The result was that someone else would often mention the idea first.

It  took four years for me to realize this is an effective tool.

3. Have an Agenda

It’s easy to say you’ll give a good idea during every review, but how can you make sure you’ll always have a good idea to give? For me, the answer was a simple checklist.

The first review checklist I made was to make sure features are testable. Not only are testers uniquely qualified to enforce testability, but if we don’t do it no one will. Bringing up testability concerns as early as possible will also make your job of testing the feature later-on much easier. My worksheet listed the key tenets of testability, had a checklist of items for each tenant, and room for notes.

At the time, I thought the concept of a review checklist was revolutionary. So much so, in fact, that I emailed Alan Page about it no less than five times. I’m now sure Alan must have thought I was some kind of stalker or mental patient. However, he was very encouraging and was kind enough to give the checklist a nice review on Toolbox–a Microsoft internal engineering website. If you work at Microsoft, you can download my testability checklist here.

I now know that not only are checklists the exact opposite of revolutionary, but there are plenty of other qualities to look for than just testability.

Test is the one discipline that knows about most (or all) of the product features.  It’s easy for us to find and identify inconsistencies between specs, such as when one PM says the product should do X, while another PM says it should do Y. It’s also our job to be a customer advocate. And we need to enforce software qualities such as performance, security, and usability. So I decided to expand my checklist.

My new checklist includes 50 attributes to look for in functional and design reviews. It’s in Excel format, so you can easily filter the items based on Review Type (Feature, Design, or Test) and Subtype (Testability, Usability, Performance, Security, etc.)

Review Checklist

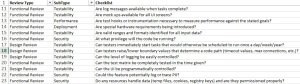
Click this image to download the Review Checklist.

If there are any other items you would like added to the checklist, please list them in the comments section below. Enjoy!

How to Get Your Bugs Fixed

Fixing a bug.

One of the worst kept secrets in Test is that all released software contains bugs. Some bugs are never found by the Test team; others are found, but the cost of fixing them is too high. To release good quality software, then, you not only have to be proficient at finding bugs, but you also have to be proficient at getting them fixed. Unfortunately some testers are good at the former, but not the latter.

A project I worked on a couple of years ago illustrates the point. We were working hard to resolve our large backlog of active bugs as the release deadline approached. Just before our deadline, I received an email declaring that we were successful, and our backlog had been resolved. This meant every bug had either been fixed, postponed, marked as a duplicate, etc. Congratulations were seemingly in order–until I looked more closely at the chart included in the email, which looked like this:

How we resolved our backlog of active bugs.

I noticed the size of the green Fixed wedge was rather small. The chart represented 150 bugs, so only 4 or 5 were fixed. I wondered why it wasn’t more. Perhaps many of those logged “bugs” weren’t product bugs at all. This turned out not to be the case, however, as the small size of the Not Repro, By Design, and Duplicate wedges tell us.

Now look at the size of the Postponed and Won’t Fix wedges; they make up almost the entire pie! It turned out that although most of the bugs were “real”, they were too trivial to fix that late in the development cycle. For example, there were misaligned UI buttons and misspellings in the product documentation.

I agreed we made the right decision by not fixing these bugs. However, each legitimate bug that was reported, but not fixed, suggests that some amount of test effort didn’t affect the released product.

It takes a lot of effort to log a bug! You have to set up the test environment, learn the product, find the bug, check if it was already logged, investigate the root cause, and file the bug. Let’s be pretentious and call this effort E. Since we had 150 bugs, we had:

150 * E = 5 bugs fixed

In a perfect world, this would be:

150 * E = 150 bugs fixed

I’m not saying that our test effort wasn’t valuable. If the Fixed wedge contained just one security flaw, it would easily justify our work. It did, however, seem as if the ratio of test-effort to bugs-fixed was less than ideal.

Some testers might blame this low ratio on the program manager who rejected their bugs. Others might blame it on the developers who either caused the bugs or never got around to fixing them. These are excuses.

Testers should take responsibility for their own bugs-logged to bugs-fixed ratio. If you think one of your bugs should be fixed, it’s up to you to make sure this happens. You’ll probably never get to the point where every one of your bugs has a positive impact on the product, but here are five “best practices” we can follow to improve our odds.

Account for Bugs in the Schedule

All software contains bugs. Your Test schedule should account for the time it’ll take to find and investigate these bugs. Similarly, the Dev schedule should account for the time it’ll take to fix them. If you don’t see this time in the Dev and Test schedules, kindly call it out.

Start Testing as Soon as Possible

The earlier your report a bug, the better chance it’ll be fixed. Not only will Dev have more time to fix your bugs, but it’s also less likely they’ll be rejected because the “bug bar” is too high. A common mistake is waiting until the end of the release cycle to schedule your bug bashes or performance testing. If you schedule these activities close to the release date, you’ll end up logging a bunch of bugs that never get fixed.

Log Detailed Bugs

When you log a bug, make sure you include all the information necessary to reproduce the issue. This should include repro steps, environment information, screenshots, videos, or anything else that may help. Be sure you also describe the customer impact as detailed as possible; this is often the biggest factor in the decision about whether to fix or defer the bug. For example, detailing real exploits for security bugs, instead of hypotheticals, can help push for fixes. Finally, use reasonable spelling, grammar, and punctuation; it doesn’t have to be perfect, but it has to be understandable by the triage team. Poorly filed bugs are often resolved as Not Repro, Won’t Fix, or Postponed because the triage team doesn’t understand the true impact of the issue.

Close Your Resolved Bugs as Soon as Possible

Although testers love finding bugs, they don’t like verifying bug fixes. Some testers consistently keep a large backlog of resolved bugs, and have to be “asked” by management to close them as the release date approaches. Their theory is that it’s better to spend time finding new bugs than closing old ones. The problem is that by the time they get around to verifying the bug fix, it’s often too late to do anything if the fix didn’t work.

Push Back on Bugs You Feel Strongly About

If you believe a bug should be fixed, don’t be afraid to fight for it. Don’t put the blame on the triage team that closed your bug as Won’t Fix or Postponed. Take ownership of the issue and present your case. If you can successfully push the bug through, both you and the customer win. But even if you can’t push it through, you’ll be respected for fighting for what you believe in and being an advocate for the customer. (Just be smart about which battles you pick!)

If you have other best practices that improve the odds of your bugs being fixed, please share them below. I would love to hear them.

Security Automation: How Can it Help Your Team?

I have been working as a Software Design Engineer in Test for a little over six years now and I wanted to share some of my experiences with security automation.  I have worked on several different on-premise and cloud-based products, the most recent being a ratings & recommendations service for the Sky Player on Xbox, Xbox.com, and the service for the Xbox Companion application.

Security automation is not all that different from other forms of test automation.  It can be used on code that is still under development as well as existing code that may have changed.

The Microsoft Security Developer center is a great resource for testers, developers, and project managers.  It has getting started guides, tools, articles, tips, and more.  Please check it out.  The Trustworthy Computing site is a good resource as well.

For security automation, feel free to start automating what you can and then iterate and improve from there.  I think that you will find that once the automation is written that it will save your team time and help find bugs.

Here are some ideas for getting started.

  • CAT.NET: CAT.NET is a static analysis tool that helps find Cross-Site Scripting issues, amongst others.  It can be run from a cmd window.  So, one approach to automating this process would be to do the following: 1) create C# console project, 2) have that code accept a drop path as an argument to the tool, 3) iterate through each .dll and/or .exe file of interest, 4) save the files in a directory of your choosing.  One could probably use PowerShell or other tools as well.  You could also consider having this run as a post build step.
  • FxCop: FxCop can also help pinpoint security issues, using its security rules.  It also has a command-line option called FxCopCmd.  So, using a batch file, PowerShell, or other means one could automate this as well.  This could be a good candidate for running as a post build step also.  It is also possible to have FxCop run as a pre-checkin step.
  • BinScope: This is another useful security tool that analyzes binaries for SDL compliance.  It can be launched from a cmd window and the results can be piped to an XML file.  Again, a batch file or PowerShell script could be used to automate this and then also be added to a post build step set.

Using this sort of automation has saved me a considerable amount of time in the past when I was acting as a “security champion” for my team, as opposed to running the tools manually.  Currently, the Xbox.com team has CAT.NET and FxCop setup as part of the build process.  By doing this they are able to catch issues early that were caused either by code changes or additions.  It takes some time to set it up though as sometimes there are false positives or known warnings that can be suppressed if appropriate.  Also, in my current role I have developed internal security automation that is relevant and helpful to my team.

Security automation has a lot of possibilities.  I hope that you find it a helpful addition to your testing toolbox.  Cheers.